Easy Oven-to-Grill Baby Back Ribs (Charcoal or Gas)
These Easy Oven-to-Grill Baby Back Ribs are seriously the best ever. They turn out perfectly juicy and tender everytime.
The Best Way to Cook Baby Back Ribs
When you are thinking about cooking ribs – especially baby back ribs – you have so many options. You can take that rack of ribs and apply high heat or low heat, grill them on a charcoal grill, use direct or indirect heat, boil them, fry them, even use a pressure cooker! The best way that I have found to make these delicious pork ribs is to use a simple combination of the approaches above.
For this rib recipe, I have an approach I use to make these baby backs as tender and delicious as possible. It is a combination of cooking time in the oven, along with direct and indirect heat with either a charcoal grill or a gas grill.
Limited Ingredients, Maximum Flavors!
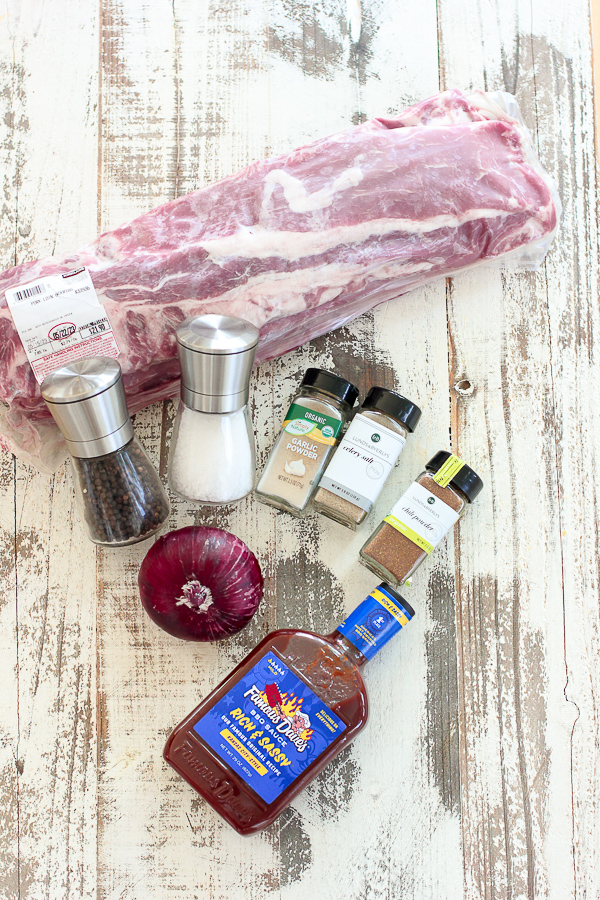
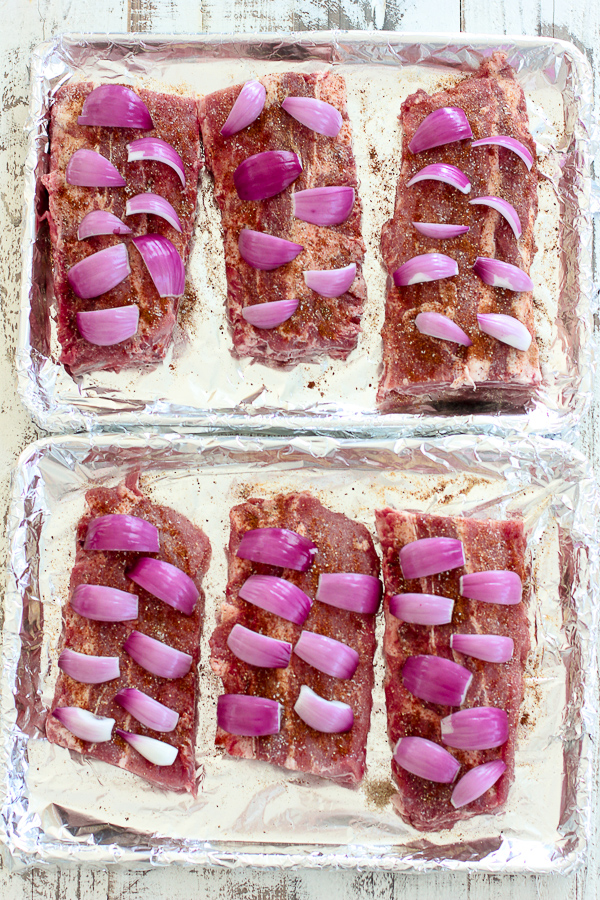
As you see in the photo above, it does not take a lot of ingredients to make yourself a great rack of baby back ribs. Along with the pork ribs, you need just a few spices, a red onion and your favorite barbecue sauce.
As for the barbecue sauce, you absolutely can use one you purchase at your local supermarket. Our favorite here at Lisa’s Dinnertime Dish is Famous Dave’s Rich & Sassy. Or, try your hand at making a new family favorite BBQ sauce on your own!
Making the Baby Back Ribs
This rib recipe is definitely focused on using barbecue sauce as opposed to a dry rub recipe. We are looking to get a great caramelized finish that just does not happen when using a dry rub. However, I have had a lot of amazing ribs using a dry rub recipe that were absolutely delicious!
To get started, you need some baby back ribs! I like to get a minimum of two full racks and usually make this ribs recipe with three full racks.
We often make these for larger groups, so the more barbecue ribs we have, the better. These also freeze really well for the next time you are feeling like some BBQ ribs, or have another large gathering.
To reheat, take them out of the freezer and let them come to room temperature. Put into a cold oven and turn the temperature to 350 degrees F. Depending on the size of the pork ribs, they may be done once the oven comes to temperature, or they make take a few more minutes.
Full Racks versus Half Racks of Ribs
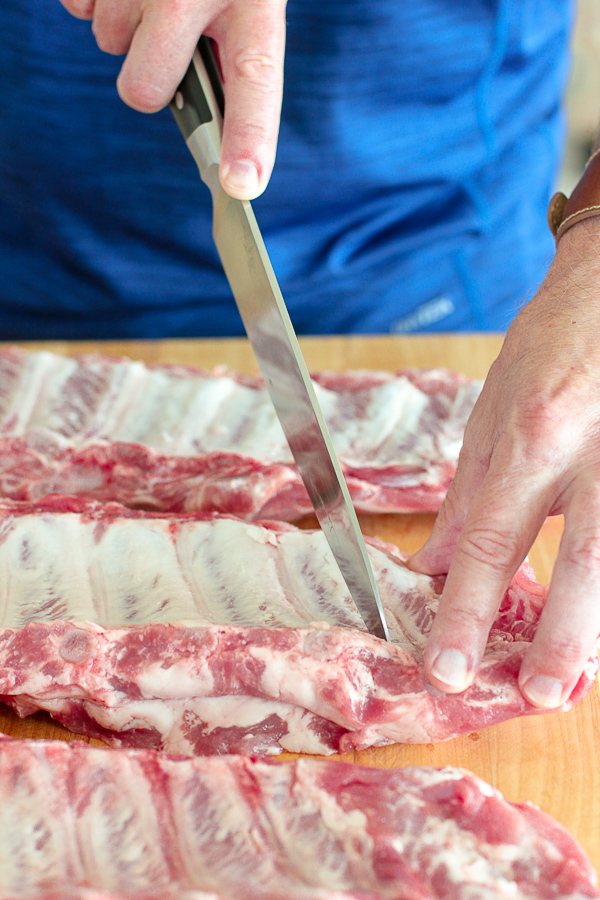
We do need to talk about the rib rack itself. There are different schools of thought as to whether you start the rib recipe with a full rack, divide each in half for half-racks, or cut into individual ribs and/or when would you do this.
For me, I think the full racks are a bit unwieldy, especially when you are moving them from a sear to indirect heat on your grill. They are already very tender at this point and can break apart easily. Plus, you have to have enough space on your grill to get them fully onto indirect heat – which can be difficult on smaller grills.
I have also seen people cut the baby backs into individual ribs once out of the oven and getting ready to put on the grill. To me, that ends up being a lot of work moving and flipping all those individual ribs!
For me, the optimal size to work with is to cut each rib rack in half at the beginning of the recipe. It makes it easier to spice, to baste and work with them on the grill. You can always cut to whatever size you want once the BBQ ribs are ready.
Approach to the Silver Skin
There is also some debate on whether to remove the silver skin on the bone side of the ribs or to score with a sharp knife. I find removing the silver skin to be a tedious process and often run out of patience well before I’m done!
So, scoring each rib on the bone side is effective in allowing the spices and BBQ sauce to penetrate and it takes so much less time. Also, I have not found there to be any issue with the tenderness, taste or consistency of the BBQ ribs when they are done. Let’s say there usually aren’t a lot of leftovers!
Please continue below for the full recipe as well as some additional tips and tricks.
Equipment Needed to Make These Baby Back Ribs
- Two large sheet pans
- Aluminum foil for lining the sheet pans and covering the ribs
- Kitchen brush for basting the ribs with sauce
- Gas or charcoal grill
- Plenty of charcoal for the charcoal grill
Ingredients Needed to Make Easy Oven-to-Grill Baby Back Ribs
Full recipe can be found below in the printable recipe card
- Baby back ribs (I usually use three full racks)
- Red onion
- Chili powder
- Garlic powder
- Celery salt
- Salt
- Black pepper
- BBQ sauce
How to Make Easy Oven-to-Grill Baby Back Ribs
- Remove ribs from the package and dry them off with paper towel. This will allow the spices to adhere better.
- Cut the rib racks in half so they are easier to handle.
- Score the back side of the ribs with a sharp knife.
- Mix spices, salt and black pepper together.
- Rub spice mix all over the top of the ribs (the meat side).
- Line your baking sheets with aluminum foil. This will make clean up so much easier.
- Divide ribs between the two pans, meat side up.
- Top the ribs with the onion slices.
- Cover each sheet pan with aluminum foil.
- Bake for 2.5 hours.
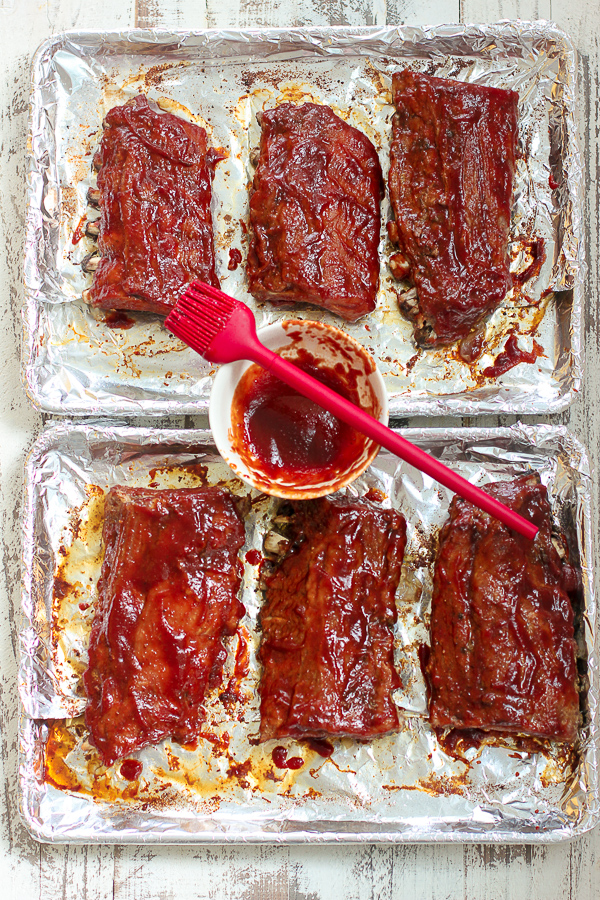
- Remove ribs from oven, uncover and baste with BBQ sauce.
- Return to oven and bake for an additional 30 minutes.
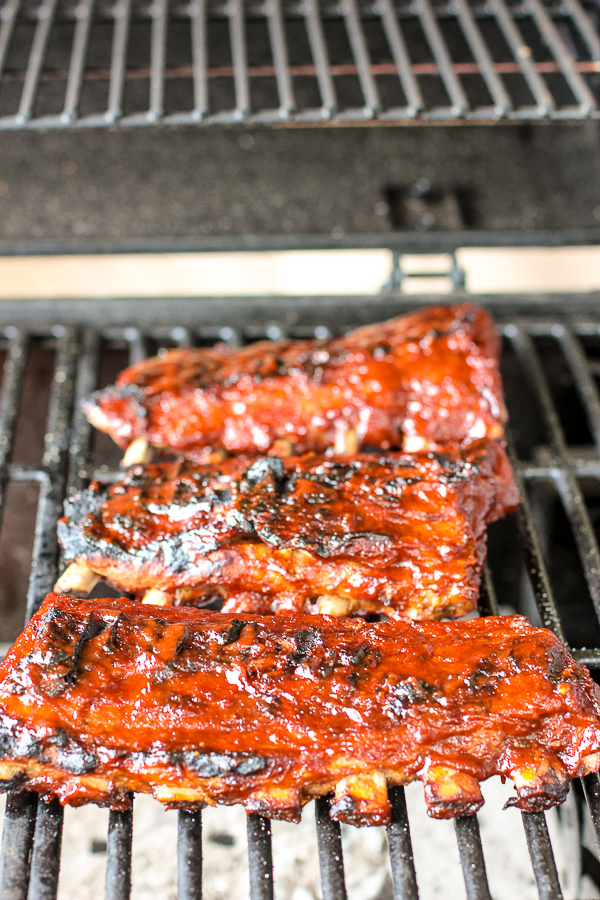
- Preheat your grill.
- You will be cooking with indirect heat, so only put charcoal or turn on the gas on one side of the grill.
- Grill ribs, meat side down, on the hot side of the grill for 2-3 minutes. Just long enough to sear.
- While the ribs are searing, baste the bone side of the ribs (which is now facing up) with BBQ sauce.
- Move the ribs to the indirect side of the grill with the meat side up.
- Baste them again and cook on the indirect heat for 30-40 minutes.
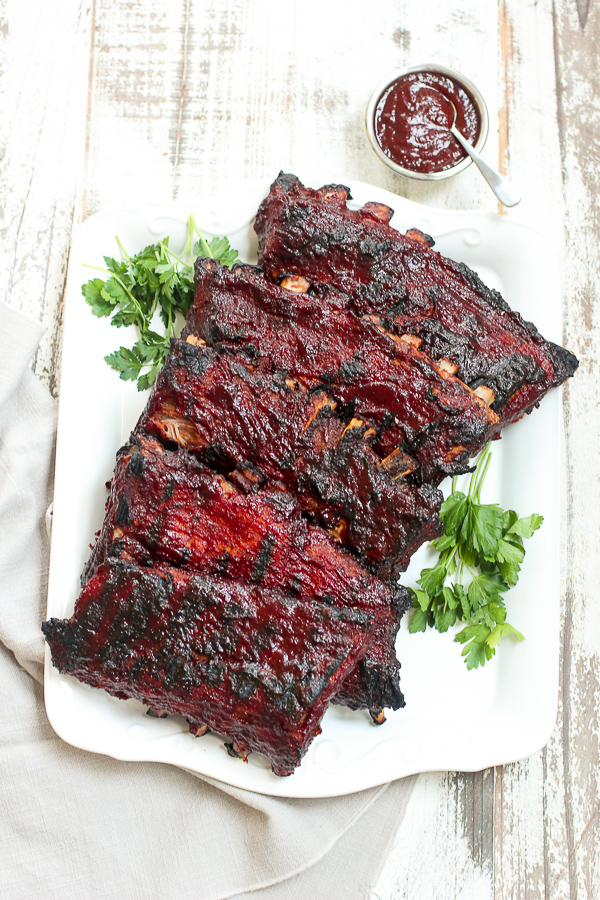
- Remove from grill and cut each rack in half (about 3 bones) to make them easier to serve.
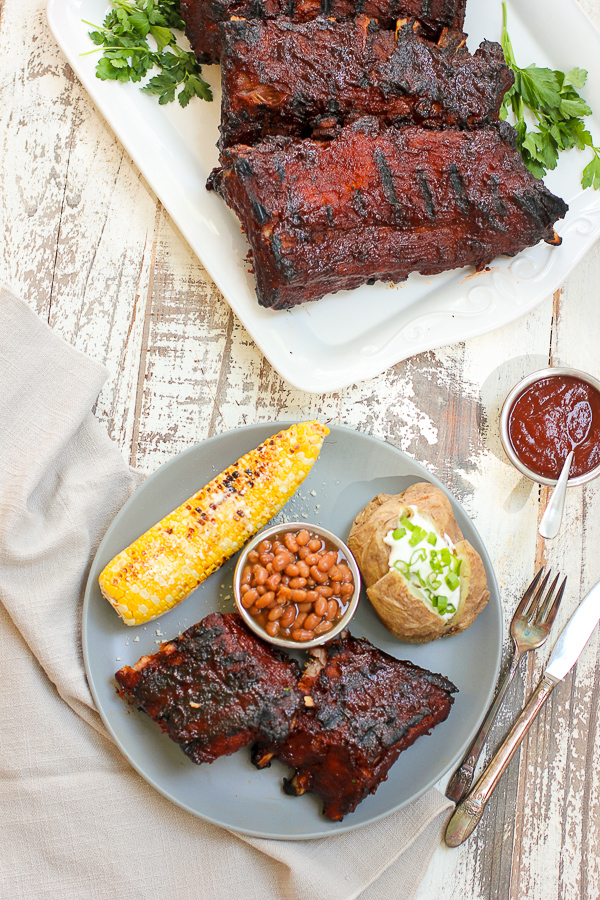
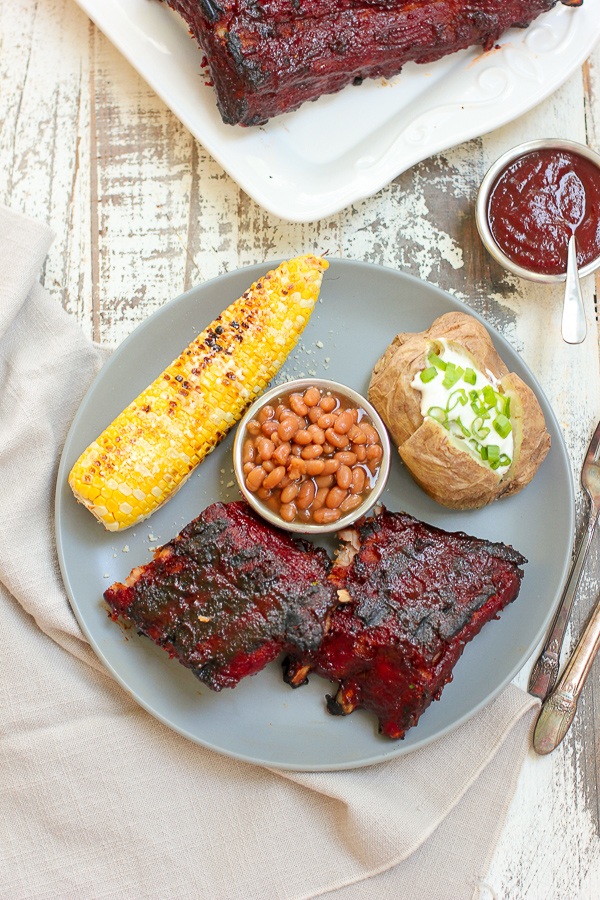
Tasty Side Dishes to Serve with Baby Back Ribs
- Slow Cooker Baked Beans
- Cauliflower Dill “No” Potato Salad
- Fiesta Corn Saute
- Field Greens Salad
- Asian Broccoli Slaw
- Shredded Brussels Sprouts with Spicy Mustard Vinaigrette
- Homemade Double Fried French Fries
- Coleslaw Minus the Mayo
- Honey Cornbread
- Easy Twice Baked Potatoes
- Dill Pickle Pasta Salad
- Black Bean and Corn Salad
- 10 Amazing Sides for 4th of July
Easy Oven-to-Grill Baby Back Ribs (Charcoal or Gas)
These Easy Oven-to-Grill Baby Back Ribs are seriously the best ever. They turn out perfectly juicy and tender everytime.
Ingredients
- 6 lbs baby back ribs
- 1 large red onion
- 1 tsp chili powder
- 1 tsp garlic powder
- 1 tsp celery salt
- 1 tsp salt
- 1 tsp black pepper
- 1 large bottle of your favorite BBQ sauce (our favorite is Famous Dave's Rich and Sassy)
Instructions
- Remove the ribs from their packaging and dry them off with paper towels. This will help the spices to adhere better.
- Cut each rack in half, they will be easier to handle this way.
- Score the membrane on the back side of the ribs. This will help the ribs to lay flat as they cook.
- Combine spices, including salt and pepper in a small bowl.
- Liberally season both sides of the ribs with this mixture.
- Place ribs on cookie sheets lined with tinfoil (for easy cleanup), meat side up.
- Cut onion into about 1 inch pieces.
- Place cut onion on top of the ribs.
- Cover with tin foil and bake in an oven pre-heated 325-degrees for 2 1/2 hours.
- After 2 1/2 hours, remove the ribs from the oven and remove tin foil.
- Remove onions from the ribs and baste the top side generously with the sauce.
- Return ribs to the 325 degree oven and bake uncovered for an additional 30 minutes.
- Meanwhile, preheat 1/2 of your grill (indirect heat) to 425-450 degrees.
- Once the ribs are finished in the oven, place them on the direct heat side of the grill, meat side down and sear for 2-3 minutes.
- While the ribs are searing, Baste the underside of the ribs with BBQ sauce.
- Turn ribs over and sear the underside for an additional 2-3 minutes.
- Move the ribs to the indirect heat side of the grill, meat side up.
- Baste the ribs one more time.
- Cook on the indirect side of the grill for 30-40 minutes, until the sauce has cooked into the ribs.
- Cut the ribs in half again, if desired, or serve as half racks.
Nutrition Information:
Yield:
8Serving Size:
1Amount Per Serving: Calories: 956Total Fat: 64gSaturated Fat: 23gTrans Fat: 1gUnsaturated Fat: 38gCholesterol: 247mgSodium: 1245mgCarbohydrates: 23gFiber: 1gSugar: 17gProtein: 69g
ENJOY!


yum! Good Job Guest Blogger! 🙂
We love ribs!!! I do them year round. We even had ribs on Christmas Eve!!!! They were fantastic! Thanks for sharing (and tell your honey, good job!) Have a Happy Valentines Day and blessed week.
Thanks, Krista! We love our ribs here, too, and Steve does such a great job with them!!
Looks great Steve (aka Mr. Dish)! I just bought some ribs myself and love them year round as well. Nice post and recipe. 🙂
Thanks, Carrie! Sometime ribs just won’t wait until summer!
Love the guest post 😉 And I love the technique of cooking them in the oven before transferring them to the grill, you get the best of both worlds. Now I just need to get a grill…and a back yard…
Thank you Katherine!
Hope when I make these they look as good as your picture.
i would kill for a bbq grill!!!
these look fabulous!!!
These look AMAZING!!!! We would love for you to share this on our Saturday Link Party at http://www.SixSistersstuff.com. Hope to see you there!
-The Sisters
Hi Lisa! Popping over from Mandy’s recipe box & am glad I did!! Your hubby’s ribs look AMAZING!! LOVE the pictures included with the step by step instructions!! Can’t wait to give it a try 🙂
Hi Steve!
Your Ribs are awesome! Please tell Lisa she is a lucky lady to have another great cook in the house. Thank you so much for sharing with Full Plate Thursday and have a great week end.
Come Back Soon!
Miz Helen
Lisa, Steve did great as a guest blogger and these ribs look fantastic. Can’t wait to try them this way next time we get ribs!
cool post! Keep up the good work!
Hi Lisa!! I just wanted to let you know that your Ribs will be a featured recipe over on tomorrow’s Weekend Potluck. It’s family-time this weekend so I won’t be online much but I wanted to let you now so that you could stop by tomorrow and grab a “featured” button if you’d like one. Thank you for sharing your recipes each week. Have a wonderful weekend!
Thank you so much, Brandi! Steve will be very excited to hear that his ribs are going to be featured at Weekend Potluck! Have a great weekend with your family! 🙂
Hey did you take the lining off the back I didn’t see that in you instructions, makes for a more tender rib
Dave~My husband doesn’t take the lining off, but he does score it. The results have always been very tender! 🙂
I have a small grill.. If I sear both sides at 450, what do I turn the grill down to in order to continue cooking for 30 more minutes
Dana – Since this is my husband’s recipe, I asked him what he would do. He said that after you sear them, take the ribs off the grill while the grill cools down and reduce the heat to about 250-300 degrees. Once the grill has cooled down, put the ribs back on to finish them.